MCP 101: Developing your first MCP in Rust

Every time I want to write a tutorial for Rust folks, I think, damn, this community is made up of some of the best people in our industry. They can just Google anything and find what they need. But, like any lazy person — myself included — sometimes we just want the answers handed to us so we can process them and move on. I mean, sure, we can scour the web, but when we open Stack Overflow, we’re like boomer programmers, just craving a quick, clear solution. Nobody wants to spend hours hunting for the right answer.
(If you’re here for the code, press: Cmd+F -> “Coding part”)
MCP 101: What Are these MCPs from user’s view?
They are small programs running on the side of your AI tool (e.g., Claude Desktop, Cursor, Windsurf) and that provide additional functionalities to it. For example, Claude Desktop can get access to your file system thanks to the filesystem MCP server. Don't worry, you always have the control, any action done with the help of an MCP server requires prior user approval.
Model Context Protocol (MCP) servers act as specialized bridges that connect AI assistants like Claude to your local files, tools, and services. They enable AI assistants to access contextual information from your environment, making interactions more relevant and productive. MCP servers follow the Model Context Protocol specification, a standardized way for AI models to request and receive information from various sources beyond their built-in knowledge.
By running MCP servers alongside your AI tools, you can give models access to your local filesystem, documentation, databases, and other tools, all while maintaining privacy since your data stays on your machine.
Why should I care?
IMO, we’re racing toward a singularity point where your imagination and creativity won’t be limited by your technical skills. Want to develop your own indie 8-bit platformer? Awesome! A Blender MCP can whip up scenes and models, an Ableton MCP can craft tracks and background music, and Sora or Midjourney MCPs can generate stunning images and artwork.
Also, there are more practical use cases — need to dig into nasty bug details in Sentry or dig through logs of Kibana? Just ask an MCP client to handle it for you.
Below are some examples I still find amusing and downright magical in their own way:
I’ve notably tried the Figma MCP and that really great; I can simply copy/paste the link to a specific design in Figma in agent conversation and tell it to implement my designs. It’s just crazy! Almost already sunsetting v0 (although v0 is really good on pure front-end).
Okay, let’s dive into some basic theory.
What is MCP?
MCP (Model Context Protocol) is an open protocol that allows AI models to interact with external tools and services. With MCP servers, the AI can perform actions beyond just generating text, such as:
- Controlling applications
- Accessing external APIs and data sources
- Running specific commands on your system
- Browsing websites and taking screenshots
MCP Architecture in Depth
MCP follows a client-server architecture with these components:
- MCP Hosts: Programs like Cursor IDE that want to access data through MCP
- MCP Clients: Protocol clients that maintain 1:1 connections with servers
- MCP Servers: Lightweight programs that each expose specific capabilities through the standardized protocol
- Data Sources: Your computer’s files, databases, services, or remote APIs that MCP servers can access
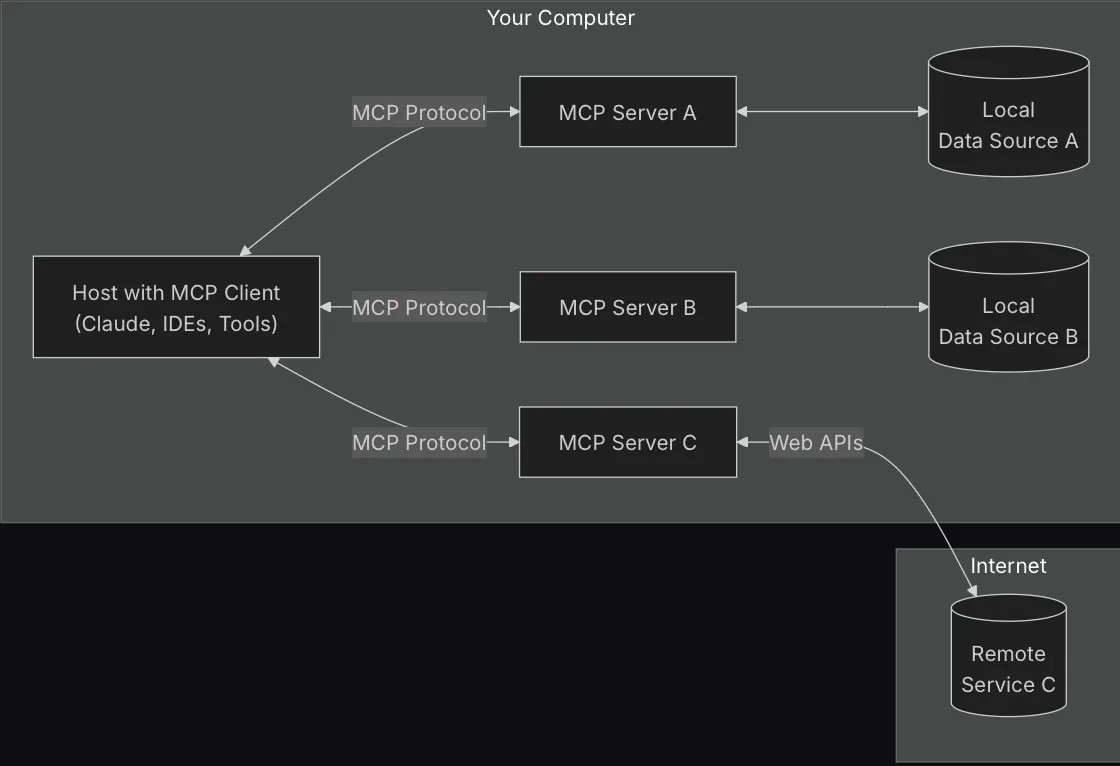
Think of MCP like a USB-C port for AI applications — it provides a standardized way to connect AI models to different data sources and tools. MCP servers act as bridges between the AI and external capabilities, expanding what you can accomplish with AI assistance in your development workflow.
Transport Formats: SSE vs STDIO
MCP servers can communicate with LLMs using two different transport formats:
SSE (Server-Sent Events):
- Used for web-based connections
- Enables real-time, one-way communication from server to client
- Better for services that run as standalone web servers
- Good for cloud-hosted or remote services
STDIO (Standard Input/Output):
- Used for local processes
- Communications happen through standard input/output streams
- Simpler setup for local tools and commands
- More efficient for tools that run directly on your machine
The choice between SSE and STDIO depends on the nature of the service and how it’s deployed. Most local MCP servers use STDIO for simplicity. We will use STDIO for MCP servers in this tutorial.
We’re done with boring theory. Let’s have fun building a custom MCP server!
Coding part: build your first MCP server
Introduction
Like Rule 63 or Rule 34, there’s always someone on the internet who’s already faced and solved the same issue you’re facing. Even if you’re implementing a new protocol for interplanetary communication, there’s probably a Vannevar Bush who dreamed it up 50 years ago.
At the time of writing this article, there are barely a dozen MCPs written in Rust. So, to get started, we first need to choose a framework or SDK to stick with. In the past, we had plenty of options:
- https://github.com/Derek-X-Wang/mcp-rust-sdk – once popular but later abandoned
- https://github.com/zed-industries/zed/tree/main/crates/context_server – the foundation for the famous mcp-rs-template
- https://github.com/entrepeneur4lyf/mcp-daemon – goes beyond the standard spec with advanced features
- https://github.com/conikeec/mcpr – the king in its prime
- https://github.com/4t145/rmcp – the ultimate winner
But, as always: Tempus omnia revelat. The RMCP SDK won and was chosen as the official SDK. While there are many implementations out there, I recommend sticking with the official RMCP SDK. It offers the best chance of ongoing support and has become the de facto standard.
Personally, my favorite MCP (codebase-wise) built on RMCP is this one:
https://github.com/Govcraft/rust-docs-mcp-server
Understanding the Tools
For this stage, we’ll use two main tools:
MCP Rust Package:
- Official Rust SDK for building MCP servers
- Provides a standardized way to expose resources, tools, and prompts to LLMs
- Handles the protocol communication so we can focus on implementing functionality
cargo Package Manager:
- Modern Rust package installer and resolver
Using these tools together will allow us to quickly create a functional MCP server with minimal boilerplate code.
Prerequisites
- Rust toolchain: Your workaround should allow you to do
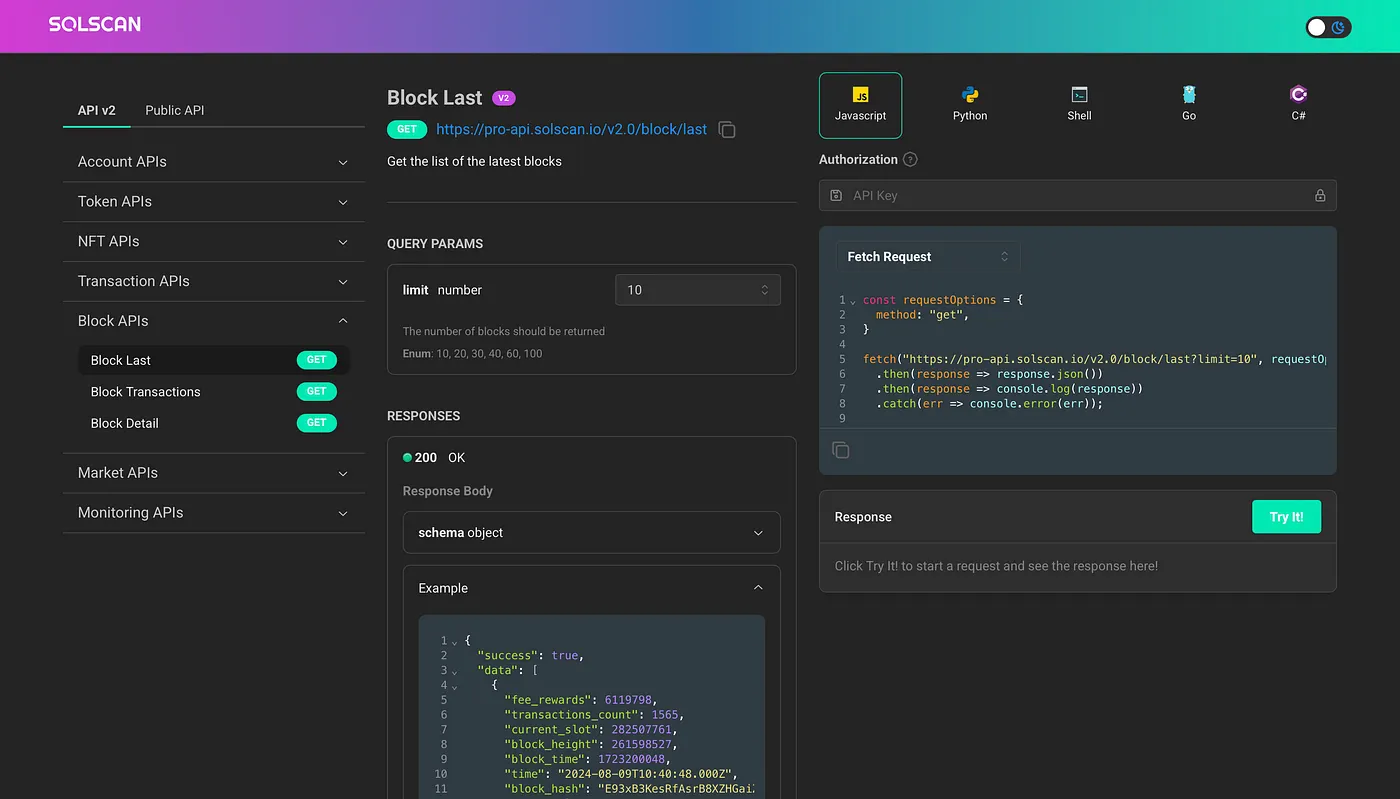
cargo new; cargo check; cargo build - Solscan Pro API key. You can obtain one from Solscan APIs. Or just use this one for tests:
eyJhbGciOiJIUzI1NiIsInR5cCI6IkpXVCJ9.eyJjcmVhdGVkQXQiOjE3NDQxOTkwMTkwNzEsImVtYWlsIjoiZ290dGEuZ28udmxhZEBnbWFpbC5jb20iLCJhY3Rpb24iOiJ0b2tlbi1hcGkiLCJhcGlWZXJzaW9uIjoidjIiLCJpYXQiOjE3NDQxOTkwMTl9.KiTlHVztcFxJs-S5pCQvQvVyqtx5khge5U2_gLa37eo
Understanding the MCP Components
There are core primitives that we implement in our server:
Resources (@mcp.resource)
- How you expose data to LLMs
- Similar to GET endpoints in a REST API
- Provide data without performing significant computation
- Should not have side effects
Resources are a core primitive in the MCP that allow servers to expose data and content that can be read by clients and used as context for LLM interactions.
Resources represent any kind of data that an MCP server wants to make available to clients. This can include:
- File contents
- Database records
- API responses
- Live system data
- Screenshots and images
- Log files
2. Tools (@mcp.tool):
- Let LLMs take actions through your server
- Expected to perform computation and have side effects
- Called directly by the AI when it needs to execute a specific function
Tools are a powerful primitive in the Model Context Protocol (MCP) that enable servers to expose executable functionality to clients.
Tools in MCP allow servers to expose executable functions that can be invoked by clients and used by LLMs to perform actions. Key aspects of tools include:
- Discovery: Clients can list available tools through the tools/listendpoint
- Invocation: Tools are called using the tools/call endpoint, where servers perform the requested operation and return results
- Flexibility: Tools can range from simple calculations to complex API interactions
The MCP Rust SDK makes it easy to implement these components as shown in our solscan server example.
Creating Solscan API MCP Server
Now, let’s create our Solscan MCP server to analyze the Solana blockchain. This will be a simple server that demonstrates the main components of an MCP server: resources and tools.
The general idea is that any type of MCP is just a program that will call another program, another MCP, or some API. I mean, technically any MCP involving some type of API will do the same. So, in case you need to analyze errors using Sentry, it will do the same but just for another API. In case you want to analyze bugs using Sentry, you will do the API for Sentry. In case you want to search for a flat with specific requirements over Airbnb, you will do the same for the Airbnb API, just in case it exists. In case you want to analyze your emails or Slack messages, you will do the same for Gmail and Slack.
Our project structure will be pretty simple:
src/
│
├──► solscan_mcp/
│     │
│     ├──► requests/
│     │     ├── block.rs
│     │     └── mod.rs
│     │
│     ├── api.rs
│     └── mod.rs
│
└──► main.rs
Let’s implement Block API
At first, we need to start the client and pass our API key.
We’re gonna do it as an STDIO server using Tokio async I/O.
// main.rs

use anyhow::Result;
use rmcp::{transport::stdio, ServiceExt};
use solscan_mcp::SolscanApi;

mod solscan_mcp;

#[tokio::main]
async fn main() -> Result<()> {
    let api_key =
        std::env::var("SOLSCAN_API_KEY").expect("SOLSCAN_API_KEY environment variable is required");

    // Create an instance of our solscan api router
    let service = SolscanApi::new(api_key)
        .serve(stdio())
        .await
        .inspect_err(|e| {
            tracing::error!("Serving error: {:?}", e);
        })?;

    service.waiting().await?;
    Ok(())
}
Next step is complementary and can be implemented in your own way
Let’s describe the data payloads that will be used for our requests to the Solscan API:
// solscan_mcp/requests/block.rs

use serde::{Deserialize, Serialize};

// https://pro-api.solscan.io/pro-api-docs/v2.0/reference/v2-block-last
#[derive(Debug, Deserialize, Serialize, schemars::JsonSchema)]
pub struct BlockLastRequest {
    #[serde(skip_serializing_if = "Option::is_none")]
    pub limit: Option<i32>,
}


// https://pro-api.solscan.io/pro-api-docs/v2.0/reference/v2-block-transactions
#[derive(Debug, Deserialize, Serialize, schemars::JsonSchema)]
pub struct BlockTransactionsRequest {
    pub block: i64,
    #[serde(skip_serializing_if = "Option::is_none")]
    pub page: Option<i32>,
    #[serde(skip_serializing_if = "Option::is_none")]
    pub page_size: Option<i32>,
    #[serde(skip_serializing_if = "Option::is_none")]
    pub exclude_vote: Option<bool>,
    #[serde(skip_serializing_if = "Option::is_none")]
    pub program: Option<String>,
}

// https://pro-api.solscan.io/pro-api-docs/v2.0/reference/v2-block-detail
#[derive(Debug, Deserialize, Serialize, schemars::JsonSchema)]
pub struct BlockDetailRequest {
    pub block: i64,
}
Generally speaking, we’re just creating a wrapper over API requests. This step could be simplified a lot if we had any wrapper crates that already provide this functionality.
In our case, we’re just replicating Request structs that stand for query param payloads we’re using for our calls.
Next step is declaring tools:
// api.rs
use std::sync::Arc;
use rmcp::{model::*, schemars, tool, Error as McpError, ServerHandler};
use serde::{Deserialize, Serialize};
use serde_json::{json, Value};
use tokio::sync::Mutex;
use crate::solscan_mcp::requests::block::*;
// Base URL for Solscan API
const SOLSCAN_API_BASE_URL: &str = "https://pro-api.solscan.io/v2.0";
#[derive(Clone)]
pub struct SolscanApi {
api_key: Arc<Mutex<String>>,
client: reqwest::Client,
}
#[tool(tool_box)]
impl SolscanApi {
pub fn new(api_key: String) -> Self {
Self {
api_key: Arc::new(Mutex::new(api_key)),
client: reqwest::Client::new(),
}
}
async fn make_request(&self, endpoint: &str, params: Option<Value>) -> Result<Value, McpError> {
let url = format!("{}{}", SOLSCAN_API_BASE_URL, endpoint);
let api_key = self.api_key.lock().await.clone();
let request = self.client.get(&url).header("token", api_key);
let request = if let Some(params) = params {
request.query(¶ms)
} else {
request
};
let response = request
.send()
.await
.map_err(|e| McpError::internal_error(format!("HTTP request error: {}", e), None))?;
if response.status() != reqwest::StatusCode::OK {
let error_text = response
.text()
.await
.unwrap_or_else(|_| "Unknown error".to_string());
return Err(McpError::internal_error(
format!("HTTP {}", error_text),
None,
));
}
response
.json::<Value>()
.await
.map_err(|e| McpError::internal_error(format!("JSON parsing error: {}", e), None))
}
#[tool(description = "Get the list of the latest blocks")]
async fn block_last(
&self,
#[tool(aggr)] request: BlockLastRequest,
) -> Result<CallToolResult, McpError> {
let mut params = json!({});
// Add optional limit parameter
if let Some(limit) = request.limit {
params["limit"] = json!(limit);
}
let response = self.make_request("/block/last", Some(params)).await?;
let content = Content::json(response).map_err(|e| {
McpError::internal_error(
"Failed to serialize JSON response",
Some(json!({"error": e.message})),
)
})?;
Ok(CallToolResult::success(vec![content]))
}
#[tool(description = "Get the list of transactions of a block")]
async fn block_transactions(
&self,
#[tool(aggr)] request: BlockTransactionsRequest,
) -> Result<CallToolResult, McpError> {
let mut params = json!({
"block": request.block,
});
// Add optional parameters
if let Some(page) = request.page {
params["page"] = json!(page);
}
if let Some(page_size) = request.page_size {
params["page_size"] = json!(page_size);
}
if let Some(exclude_vote) = request.exclude_vote {
params["exclude_vote"] = json!(exclude_vote);
}
if let Some(program) = &request.program {
params["program"] = json!(program);
}
let response = self
.make_request("/block/transactions", Some(params))
.await?;
let content = Content::json(response).map_err(|e| {
McpError::internal_error(
"Failed to serialize JSON response",
Some(json!({"error": e.message})),
)
})?;
Ok(CallToolResult::success(vec![content]))
}
#[tool(description = "Get the details of a block")]
async fn block_detail(
&self,
#[tool(aggr)] request: BlockDetailRequest,
) -> Result<CallToolResult, McpError> {
let params = json!({
"block": request.block,
});
let response = self.make_request("/block/detail", Some(params)).await?;
let content = Content::json(response).map_err(|e| {
McpError::internal_error(
"Failed to serialize JSON response",
Some(json!({"error": e.message})),
)
})?;
Ok(CallToolResult::success(vec![content]))
}
}
#[tool(tool_box)]
impl ServerHandler for SolscanApi {
fn get_info(&self) -> ServerInfo {
ServerInfo {
protocol_version: ProtocolVersion::V_2024_11_05,
capabilities: ServerCapabilities::builder()
.enable_tools()
.build(),
server_info: Implementation::from_build_env(),
instructions: Some("This server provides tools to access the Solscan API for Solana blockchain data. Use these tools to fetch token information, account activities, and transaction details on the Solana blockchain.".to_string()),
}
}
}
So let’s analyze this code block. We’re gonna skip new() and make_request() functions as they are boring.
The most interesting parts are the MCP-related ones:
- ServerHandler
- #[tool(tool_box)]
- CallToolResult
#[tool(tool_box)] — creates a static toolbox to store the tool attributes.
Rust SDK provides toolbox and tool macros to simplify tool creation quickly.
CallToolResult — The only thing we should do is to make the function’s return type implement IntoCallToolResult.
And we can just implement IntoContents, and the return value will be marked as success automatically.
If we return a type of Result<T, E> where T and E both implemented IntoContents, it's also OK.
ServerHandler – implements call_tool and list_tool by querying static toolbox.
Technically, we're done, and we're ready to run cargo build --release.
As you just saw, implementing an MCP server is really nothing more complicated than implementing a wrapper around an API.
Check the full code here: https://github.com/wowinter13/solscan-mcp
I intentionally skipped details for both mod.rs and Cargo.toml to not overload this article with a ton of boilerplate code.
Testing Our Custom MCP Server
Adding the Server to MCP Configuration
To test our custom MCP server, we need to add it to Claude's project configuration, i.e., provide the address of the executable program for the related Claude config (claude_desktop_config.json)
The sequence is pretty simple:
- Run
cargo build --release - Run
export SOLSCAN_API_KEY=actual_api_key - Add server configuration - for the command address, you can use this command to get the exact address of the executable:
echo $(pwd)/target/release/project-name
{
  "mcpServers": {
    "solscan-mcp": {
      "command": "$pwd/target/release/$project-name",
      "args": [],
      "env": {
        "SOLSCAN_API_KEY": "your_solscan_api_key"
      }
    }
  }
}
Checking actual output
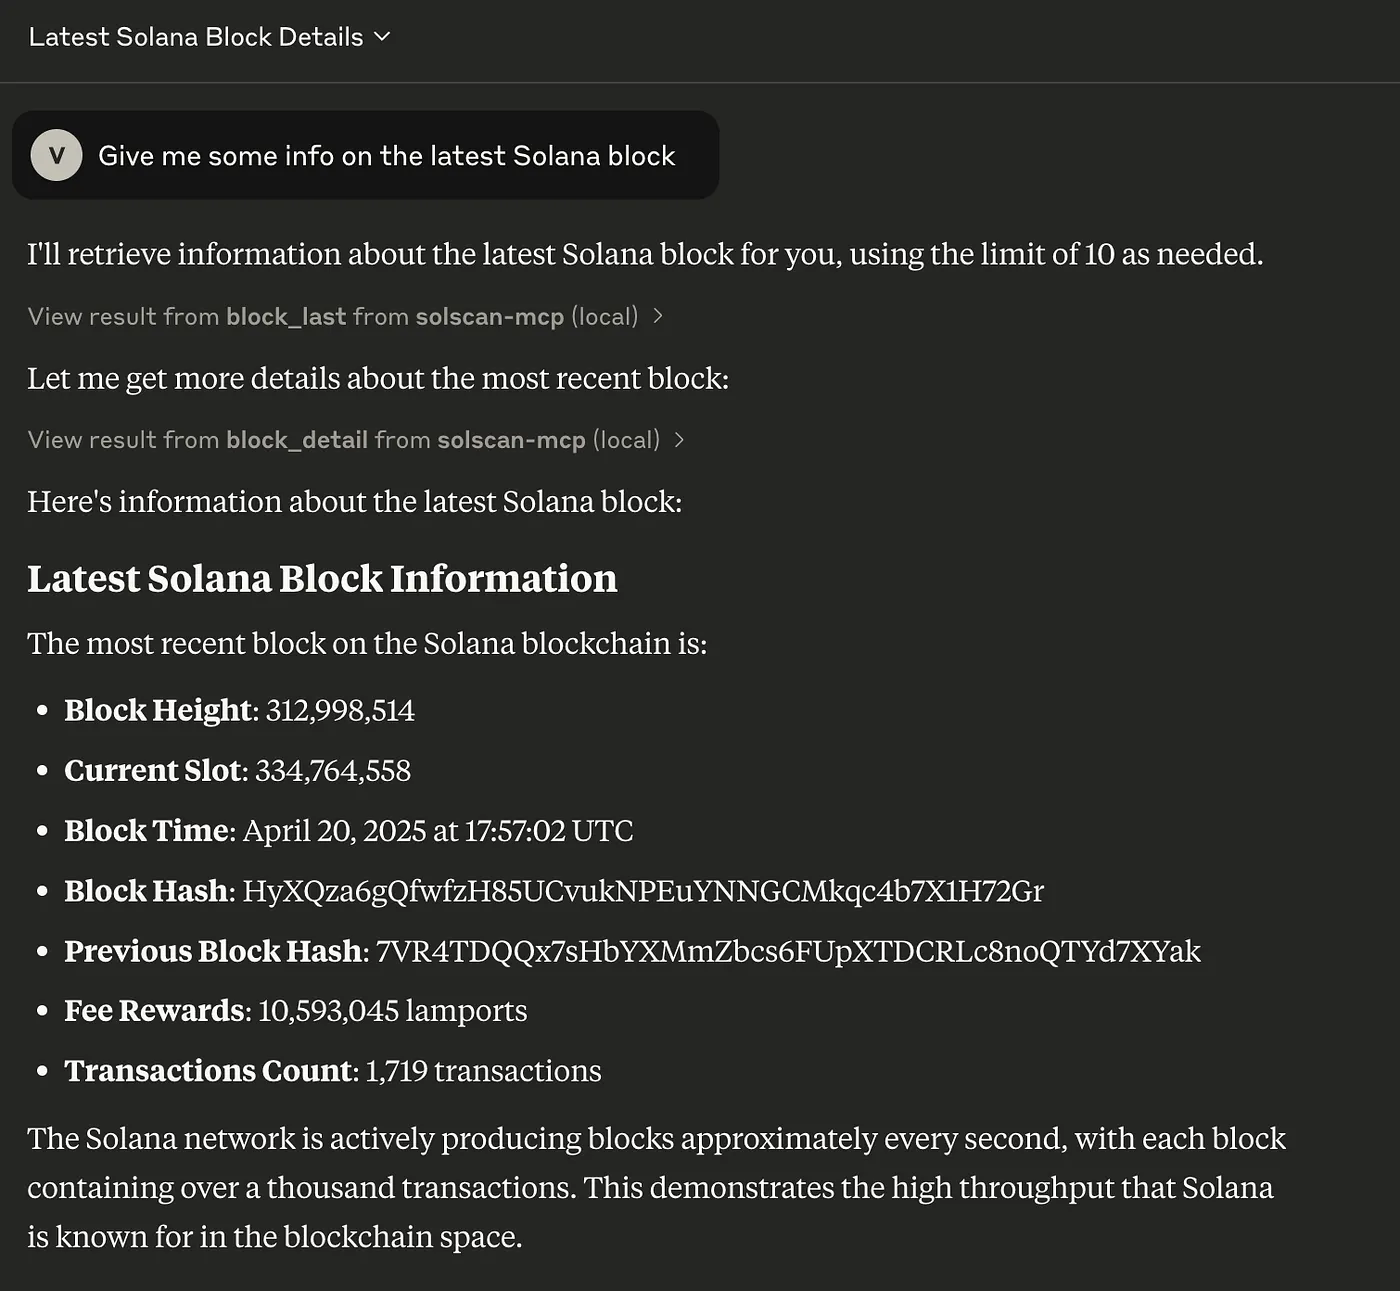
As easy as ever before!
Annex
Useful MCP Servers for Full-Stack Devs
The MCP Servers repository contains numerous servers for different use cases. Here are some of the most valuable ones:
- Filesystem (
filesystem): Gives AI assistants read access to your local files and directories. Essential for code-related tasks and document analysis. - Git (
git): Provides information about your Git repositories, including commit history, branches, and diffs. Invaluable for code reviews and understanding project changes. - Shell (
shell): Allows AIs to run shell commands on your behalf, making automation tasks easier. Use with caution as it can execute arbitrary commands. - Database (
database): Connects to various databases (MySQL, PostgreSQL, SQLite) to query data and schema information. Great for data analysis tasks. - Web (
web): Enables fetching and summarizing content from web pages. Useful for research and keeping information current. - Diagram (
diagram): Creates and edits diagrams using tools like Mermaid. Perfect for visualizing complex systems and workflows. - Figma (
figma): Interfaces with Figma design files, allowing AI to understand and suggest changes to your designs. - Notion (
notion): Connects to your Notion workspace, enabling AI to reference and update your notes and documentation. - VSCode (
vscode): Integrates with VSCode to provide context about your current project, open files, and editor state.
More Links/Further Research (Learning Materials)
- https://modelcontextprotocol.io/quickstart/server
- https://github.com/modelcontextprotocol/rust-sdk/tree/main
- https://enlightby.ai/projects/11
- https://github.com/wowinter13/solscan-mcp
- https://medium.com/data-science-in-your-pocket/best-mcp-servers-you-should-know-019226d01bca